When using the email builder, you can drag and drop an "Image" block into a section column, then upload an image or point to a URL where an image is hosted.
Upload images
To upload an image:
Drag and drop an "Image" content block from the "Build" menu on the left into a section column.
In the left sidebar, click Choose file, then select your file to add your image. Alternatively, you can drag and drop the image from your file manager directly into the image block.
To adjust the width of an image so it lines up with the text in a section column, instead of the section border, select the Add image spacing checkbox.
We recommend adding alt text to your images, as it will show when recipients have images turned off in their email clients.
Supported images
The email builder supports images up to 20MB in size. It's in your interest to keep file sizes as low as possible: large emails take longer to download, and may be blocked by some email servers.
We support the following file formats:
PNG, including transparency
JPG/JPEG
GIF, including animated GIFs
Transparent PNGs may have their transparency removed if you edit them with our built-in image editor. This has the effect of making the transparent regions of PNG files look black.
Animated GIFs
Animated GIFs are supported in the email builder. They can be a great way to show off a feature, and introduce eye-catching movement to your email.
Some email clients, such as Outlook 2007–2016 on Windows and Windows Phone 7, only show the first frame of an animated GIF and don't play the animation. When using animated GIFs, make sure they look good for both those who can see the animation, and those who can only see the first frame.
You can test what your email looks like for both situations in the email builder. When designing your email, only the first frame is shown. To see the animated version, click the Preview button.
If you edit an animated GIF using our built-in image editor, it will be resaved as a static image.
Image resolutions
The email builder supports uploading images with very high resolutions, however any image larger than 1.5x the maximum column width in an email (whether on desktop or mobile) will be resized down to the 1.5x width limit. This is wide enough to work well with Retina/HiDPI displays.
For the best results, you'll need to take into account the maximum column widths for both desktop (600px) and mobile (320px) emails, and how content is resized when shown on a mobile device.
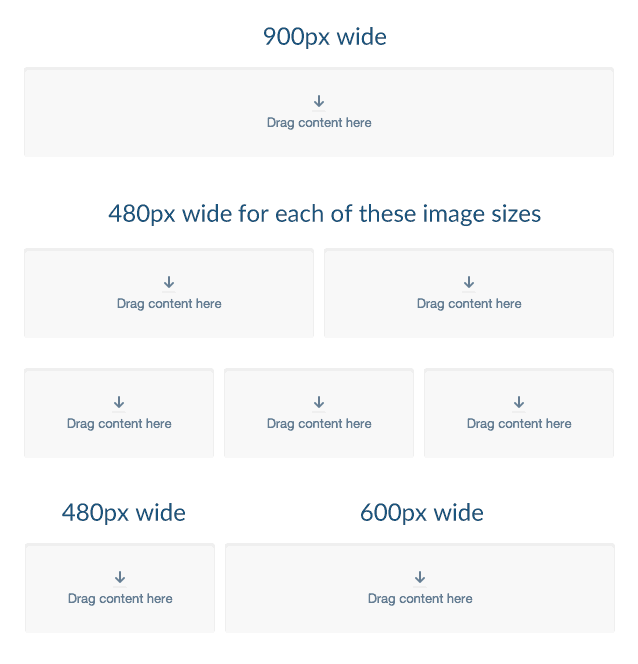
To get the best results for each section layout, upload images with the widths shown below:
Incorrectly rotated images
If an image is taken by a mobile phone or digital camera, it will contain EXIF data. Among other information, EXIF may record what the "proper" orientation of an image is. How this is interpreted by applications can differ, with images potentially being displayed in the wrong orientation.
The email builder does not support EXIF rotation data, so certain images may import with the incorrect orientation. To fix incorrectly rotated images:
Click on the imported image in the email builder, then click Edit.
Click Orientation, then click the Rotate or Mirror buttons to adjust the image.
When done click Apply, then Save.
Uploading issues
Images will appear to never finish uploading if:
the image is corrupt
there are strict corporate firewall rules preventing the upload from completing.
If you are still having trouble uploading, a browser extension may be getting in the way, or you may be using an older browser. Disable any extensions you may be using, or update to a newer version of Chrome, Firefox, Safari, or Microsoft Edge and try again.
Images from a URL
The image from a URL feature is available to approved accounts only.
When you add an image to the email builder by uploading it, the image is hosted on our servers, meaning you can't overwrite it or serve dynamic images. With the image from a URL feature, you host the images on your own server, giving you complete control.
To add an image from a URL:
Drag and drop the image content block from the "Build" menu on the left into a section column.
In the left sidebar, below "Enter image URL", enter the URL that points to your image file.


